FusionCharts allows you to add a caption, sub-caption, x-axis title and y-axis title for your charts. You can configure the font properties for each of them individually or collectively. You can also apply styles and animation effects to them.
Caption refers to the title of the Chart, e.g., "Monthly Summary".
XML/JSON Attribute:
<chart caption='Monthly Summary' ...>
This will add a title to the chart as shown below:

To align the caption/sub-caption at left or side of canvas, you'll have to use STYLES as under. This feature was added in v3.2.
<chart caption='Quarterly Sales Summary' subcaption='Figures in $' xAxis='Quarter' yAxisName='Sales' outCnvBaseFont='Arial' outCnvBaseFontSize='12' outCnvBaseFontColor='333333'>
   <set label='Quarter 1' value='420500' />
   <set label='Quarter 2' value='295400' />
   <set label='Quarter 3' value='523400' />
   <set label='Quarter 4' value='465400' />
   <styles>
   <definition>
      <style name='myCaptionFont' type='font' align='left'/>
   </definition>
   <application>
      <apply toObject='Caption' styles='myCaptionFont' />
      <apply toObject='SubCaption' styles='myCaptionFont' />
   </application>
   </styles>
</chart>
{
  "chart":{
    "caption":"Quarterly Sales Summary",
    "subcaption":"Figures in $",
    "xaxis":"Quarter",
    "yaxisname":"Sales",
    "outcnvbasefont":"Arial",
    "outcnvbasefontsize":"12",
    "outcnvbasefontcolor":"333333"
  },
  "data":[{
      "label":"Quarter 1",
      "value":"420500"
    },
    {
      "label":"Quarter 2",
      "value":"295400"
    },
    {
      "label":"Quarter 3",
      "value":"523400"
    },
    {
      "label":"Quarter 4",
      "value":"465400"
    }
  ],
  "styles":[{
      "definition":[{
          "style":[{
              "name":"myCaptionFont",
              "type":"font",
              "align":"left"
            }
          ]
        }
      ],
      "application":[{
          "apply":[{
              "toobject":"Caption",
              "styles":"myCaptionFont"
            },
            {
              "toobject":"SubCaption",
              "styles":"myCaptionFont"
            }
          ]
        }
      ]
    }
  ]
}
This will result in:
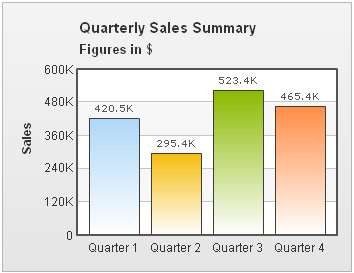
You can also add a sub-title to your chart. Example: "Figures in USD"
XML/JSON Attribute:
<chart ... subCaption='Figures in USD' ...>
It will add a sub-title to the chart as shown below:

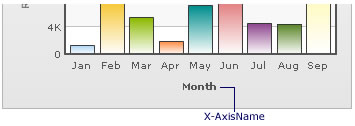
To set the x-axis name, you use the following XML/JSON:
<chart ... xAxisName='Month' ...>
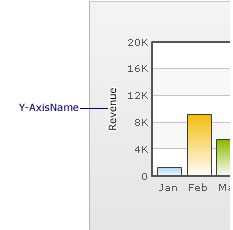
Similar to x-axis name, you can also set a y-axis name as under:
<chart ... yAxisName='Revenue' ..>
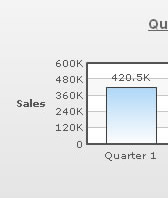
The y-axis name is rotated by default on the chart. In that case, you can opt to show y-axis name in horizontal form using the following attribute:
<chart rotateYAxisName='0' ..>
It will yield the following output:
If you want to set the maximum width that the non-rotated y-axis title can assume, you can set it in pixels using the following attribute:
<chart ... rotateYAxisName='0' yAxisNameWidth='40' ...>
Using a single font property for all the titles
If you want to specify a single font property for all the text outside canvas area, you can use outCnvBaseFont attribute group. The font properties specified as a part of this attribute group will be applied to Caption, Sub-Caption, X-Axis & Y-Axis names, Data Labels, Divisional Line and Trendline values.
The following attributes are a part of this group:
| Attribute Name | Description | Example |
| outCnvbaseFont | Lets you define the font family e.g., Arial, Verdana etc | outCnvBaseFont='Verdana' |
| outCnvbaseFontSize | Lets you define the font size (8-72) | outCnvbaseFontSize='10' |
| outCnvbaseFontColor | Lets you define the font color. Use hex code for the color without #. E.g., 000000 or 009933 or 999999 | outCnvbaseFontColor='009933' |
Example :
<chart caption='Quarterly Sales Summary' subcaption='Figures in $' xAxis='Quarter' yAxisName='Sales' outCnvBaseFont='Arial' outCnvBaseFontSize='12' outCnvBaseFontColor='333333'>
   <set label='Quarter 1' value='420500' />
   <set label='Quarter 2' value='295400' />
   <set label='Quarter 3' value='523400' />
   <set label='Quarter 4' value='465400' />
</chart>
{
  "chart":{
    "caption":"Quarterly Sales Summary",
    "subcaption":"Figures in $",
    "xaxis":"Quarter",
    "yaxisname":"Sales",
    "outcnvbasefont":"Arial",
    "outcnvbasefontsize":"12",
    "outcnvbasefontcolor":"333333"
  },
  "data":[{
      "label":"Quarter 1",
      "value":"420500"
    },
    {
      "label":"Quarter 2",
      "value":"295400"
    },
    {
      "label":"Quarter 3",
      "value":"523400"
    },
    {
      "label":"Quarter 4",
      "value":"465400"
    }
  ]
}
Output:
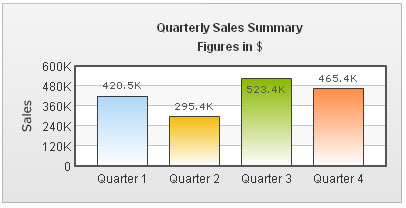
As you can see above, all the text outside chart canvas has assumed the font properties specified as part of that attribute group.
If you do not want to specify a single font property for all the text, you can use the STYLES feature of FusionCharts v3. This also allows you finer control over the font. Using this you can bold, italicize or underline your text. Or, you can also specify a border and background colors.
Shown below is a basic example where we've used different font properties for caption and sub-caption.
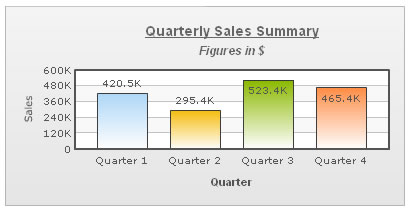
The data for this chart is as under. To read more on Styles, please refer to FusionCharts and Styles.
<chart caption='Quarterly Sales Summary' subcaption='Figures in $' xAxisName='Quarter' yAxisName='Sales'>
  <set label='Quarter 1' value='420500' />
  <set label='Quarter 2' value='295400' />
  <set label='Quarter 3' value='523400' />
  <set label='Quarter 4' value='465400' />
  <styles>
      <definition>
            <style name='myCaptionFont' type='font' font='Arial' size='14' color='666666' bold='1' underline='1'/>
            <style name='mySubCaptionFont' type='font' font='Arial' size='12' color='666666' italic='1'/>
            <style name='myAxisTitlesFont' type='font' font='Arial' size='11' bold='1'/>
      </definition>
      <application>
            <apply toObject='Caption' styles='myCaptionFont' />
            <apply toObject='SubCaption' styles='mySubCaptionFont' />
            <apply toObject='XAxisName' styles='myAxisTitlesFont' />
      </application>
  </styles>
</chart>
{
  "chart":{
    "caption":"Quarterly Sales Summary",
    "subcaption":"Figures in $",
    "xaxisname":"Quarter",
    "yaxisname":"Sales"
  },
  "data":[{
      "label":"Quarter 1",
      "value":"420500"
    },
    {
      "label":"Quarter 2",
      "value":"295400"
    },
    {
      "label":"Quarter 3",
      "value":"523400"
    },
    {
      "label":"Quarter 4",
      "value":"465400"
    }
  ],
  "styles":[{
      "definition":[{
          "style":[{
              "name":"myCaptionFont",
              "type":"font",
              "font":"Arial",
              "size":"14",
              "color":"666666",
              "bold":"1",
              "underline":"1"
            },
            {
              "name":"mySubCaptionFont",
              "type":"font",
              "font":"Arial",
              "size":"12",
              "color":"666666",
              "italic":"1"
            },
            {
              "name":"myAxisTitlesFont",
              "type":"font",
              "font":"Arial",
              "size":"11",
              "bold":"1"
            }
          ]
        }
      ],
      "application":[{
          "apply":[{
              "toobject":"Caption",
              "styles":"myCaptionFont"
            },
            {
              "toobject":"SubCaption",
              "styles":"mySubCaptionFont"
            },
            {
              "toobject":"XAxisName",
              "styles":"myAxisTitlesFont"
            }
          ]
        }
      ]
    }
  ]
}
You cannot change the font face for y-axis name, if you show it as rotated, as it uses embedded characters.
You can also apply effects (shadow, glow, blur, bevel etc.) to the chart titles using STYLES. Shown below is an example:
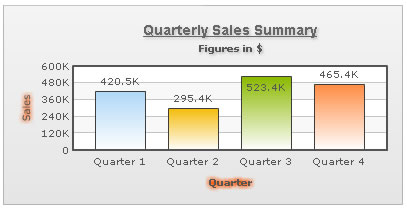
Here, we've applied shadow to caption and sub-caption and glow to x-axis name and y-axis name. The data can be listed as under:
<chart caption='Quarterly Sales Summary' subcaption='Figures in $' xAxisName='Quarter' yAxisName='Sales'>
  <set label='Quarter 1' value='420500' />
  <set label='Quarter 2' value='295400' />
  <set label='Quarter 3' value='523400' />
  <set label='Quarter 4' value='465400' />
  <styles>
      <definition>
          <style name='myCaptionFont' type='font' font='Arial' size='14' color='666666' bold='1' underline='1'/>
          <style name='myShadow' type='Shadow' color='999999' angle='45'/>
          <style name='myGlow' type='Glow' color='FF5904'/>
      </definition>
      <application>
          <apply toObject='Caption' styles='myCaptionFont,myShadow' />
          <apply toObject='SubCaption' styles='myShadow' />
          <apply toObject='XAxisName' styles='myGlow' />
          <apply toObject='YAxisName' styles='myGlow' />
      </application>
   </styles>
</chart>
{
"chart":{
"caption":"Quarterly Sales Summary",
"subcaption":"Figures in $",
"xaxisname":"Quarter",
"yaxisname":"Sales"
},
"data":[{
"label":"Quarter 1",
"value":"420500"
},
{
"label":"Quarter 2",
"value":"295400"
},
{
"label":"Quarter 3",
"value":"523400"
},
{
"label":"Quarter 4",
"value":"465400"
}
],
"styles":[{
"definition":[{
"style":[{
"name":"myCaptionFont",
"type":"font",
"font":"Arial",
"size":"14",
"color":"666666",
"bold":"1",
"underline":"1"
},
{
"name":"myShadow",
"type":"Shadow",
"color":"999999",
"angle":"45"
},
{
"name":"myGlow",
"type":"Glow",
"color":"FF5904"
}
]
}
],
"application":[{
"apply":[{
"toobject":"Caption",
"styles":"myCaptionFont,myShadow"
},
{
"toobject":"SubCaption",
"styles":"myShadow"
},
{
"toobject":"XAxisName",
"styles":"myGlow"
},
{
"toobject":"YAxisName",
"styles":"myGlow"
}
]
}
]
}
]
}
You can also apply animation effects to the titles using STYLES. Shown below is an example which creates a bounce effect for the caption:
<chart caption='Quarterly Sales Summary' subcaption='Figures in $' xAxisName='Quarter' yAxisName='Sales'>
  <set label='Quarter 1' value='420500' />
  <set label='Quarter 2' value='295400' />
  <set label='Quarter 3' value='523400' />
  <set label='Quarter 4' value='465400' />
  <styles>
     <definition>
         <style name='myCaptionAnim' type='animation' param='_y' easing='Bounce' start='0' duration='1' />
     </definition>
     <application>
         <apply toObject='Caption' styles='myCaptionAnim' />
     </application>
  </styles>
</chart>
{
"chart":{
"caption":"Quarterly Sales Summary",
"subcaption":"Figures in $",
"xaxisname":"Quarter",
"yaxisname":"Sales"
},
"data":[{
"label":"Quarter 1",
"value":"420500"
},
{
"label":"Quarter 2",
"value":"295400"
},
{
"label":"Quarter 3",
"value":"523400"
},
{
"label":"Quarter 4",
"value":"465400"
}
],
"styles":[{
"definition":[{
"style":[{
"name":"myCaptionAnim",
"type":"animation",
"param":"_y",
"easing":"Bounce",
"start":"0",
"duration":"1"
}
]
}
],
"application":[{
"apply":[{
"toobject":"Caption",
"styles":"myCaptionAnim"
}
]
}
]
}
]
}